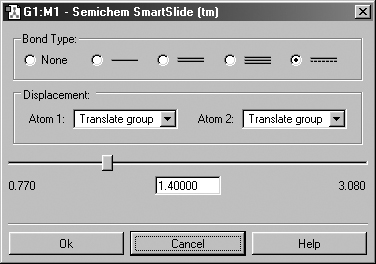
Figure 10. The Bond SmartSlide
This dialog can be used to add, remove and change bond lengths.
Three buttons, the Bond SmartSlide button, the Angle SmartSlide button, and the Dihedral SmartSlide button, summon the Semichem SmartSlide dialogs to allow rapid and intuitive modification of geometric components.
Note that the OK button must be pressed before any of the changes made on any SmartSlide are actually applied to the molecule. Clicking the close box will discard any changes (as will selecting the Cancel button).
The Bond SmartSlide is illustrated in Figure 10. The initial bond length value is set to the distance between the selected pair of atoms, and the type of bond existing between them is indicated. The SmartSlide provides access to all the possible bond types.
Figure 10. The Bond SmartSlide
This dialog can be used to add, remove and change bond lengths.
The interatomic distance is dynamically adjusted by moving the slider along the scale. Values may also be directly entered in the text box.
You can change the bond type by clicking one of the bond type radio buttons without affecting the valence on the atoms from which the bonds are removed. Note that this is a purely visual exercise, as quantum mechanical methods like those in Gaussian do not take account of connectivity, but rather determine bonding from the wavefunction.
Note that the Bond SmartSlide is also used to add bonds between unbonded atoms. Simply click on the two atoms to be bonded as usual. When the SmartSlide opens, click on the type of bond desired, and the bond will be created. Similarly, to remove a bond, select the two atoms you want to unbond, and then select the None radio button in the dialog.
The Displacement fields specify how attached groups are handled as the bond distance changes:
Translate Atom: Move only the atom, keeping the group's position fixed in space.
Translate Group: Move the attached group along with the atom (i.e., as a single unit).
Fixed: Do not allow the atom or the group to move (all movement occurs at the other atom).
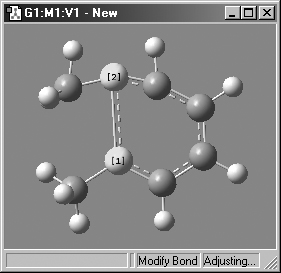
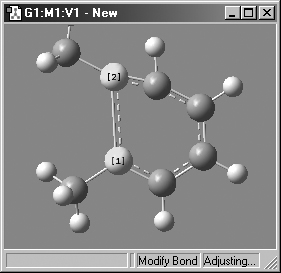
Figure 11 illustrates the effects of different combinations of these choices.
 |
 |
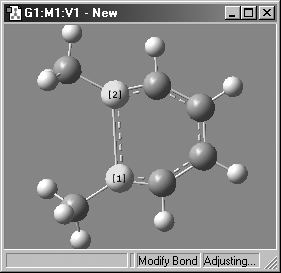 |
Figure 11. Bond Length Modification Options
All three of these structures result from lengthening the bond distance between
the two selected C atoms (to the same value in all three cases). In the left
picture, atom 1 was held fixed, and atom 2 was set to Translate Atom. Compare
this to the middle picture which also held atom 1 fixed and set atom 2 to Translate
Group. The upper methyl group stays fixed in the first case, while the 1-2-R
bond angle remains unchanged in the center case. The right picture sets both
atoms to Translate Group, probably the most common choice for a case like this
one.
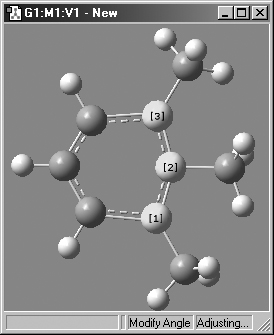
Figure 12 illustrates the dialog associated with the Angle SmartSlide. The dialog for the Dihedral SmartSlide is similar, but it includes Displacement fields only for Atom 1 and Atom 4.
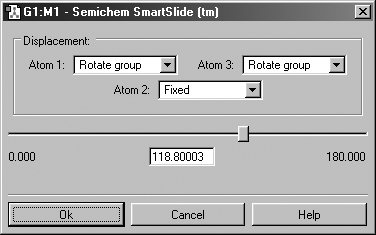
Figure 12. Angle and Dihedral SmartSlide
This dialog can be used to modify bond angles and dihedral angles (depending
on the number of atoms that are selected.
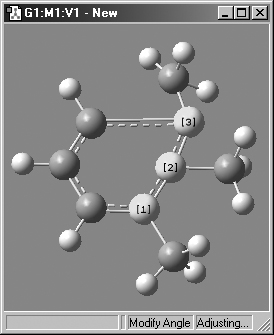
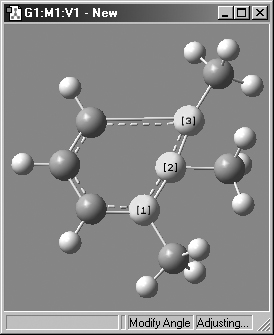
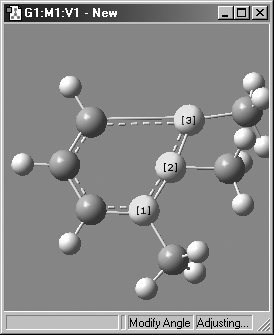
Figure 13 illustrates some of the combinations of various Displacement settings for bond angles. The possible choices are
Rotate Atom: Move only the atom, keeping the group's position fixed in space.
Translate Group: Move the attached group along with the atom as a single unit.
Rotate Group: The group's position rotates along with the atoms as the angle changes.
Fixed: Do not allow the atom or the group to move (all movement occurs at other atoms).
 |
 |
 |
|
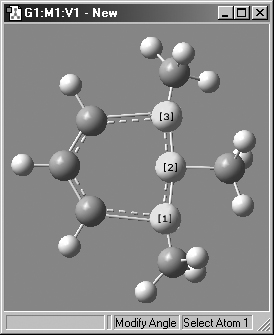
1,2=Fixed, 3=Translate Atom
|
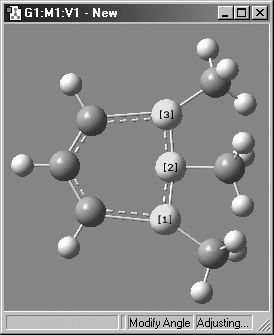
1,2=Fixed, 3=Translate Group
|
1,2=Fixed, 3=Rotate Group
|
 |
 |
 |
|
1,2=Rotate Atom, 3=Fixed
|
1,2=Translate Group, 3=Fixed
|
1,2=Rotate Group, 3=Fixed
|
Figure 13. Bond Angle Modification Options
All six of these structures result from increasing the 1-2-3 bond angle.
In the top row, atoms 1 and 2 are both held fixed. Compare the results of increasing
the bond angle to the same value in the three cases (keeping in mind the “normal”
position for the ring atoms and the methyl groups). The movement of the methyl
group attached to atom 3 ranges from none in the first frame to a little in
frame 2 to substantial in frame 3. In the second row, atom 3 is held fixed while
other choices are used for atoms 1 and 2. Comparison of these illustrations
as well as experimentation will make the differences between the choices clear
and familiar.
Previous Next