The Gaussian Calculation Setup Window
The first step in producing a Gaussian input file is to build the desired
molecule. The bond lengths, bond angles, and dihedral angles for the molecule
will be used by GaussView to write a molecular structure for the calculation.
Once this is completed, you can use the Calculation=>Gaussian menu path to
open the Gaussian Calculation Setup dialog. It is illustrated in Figure
46.
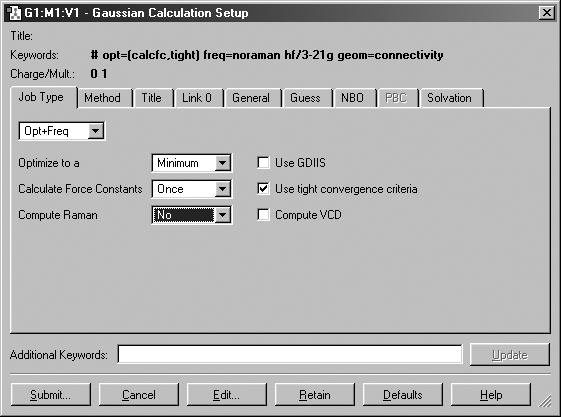
Figure 46. The Gaussian Calculation Setup Dialog
This dialog allows you to set up virtually all types of Gaussian calculations
and to submit them from GaussView. The route section that GaussView is generating
appears at the top of the dialog, and it is constantly updated as you make selections
in the dialog.
The Gaussian Calculation Setup dialog contains several panels, described
individually below. The buttons at the bottom of the dialog have the following
effects
-
Submit: Starts a Gaussian calculation using the current input
file. You will be prompted to save the input file if you have not already
done so.
-
Cancel: Closes the dialog box and returns all selections to their
default values.
-
Edit: Allows direct access to the input file with an external text
editor. The input file is not available for editing until it has been saved
with GaussView.
-
Retain: Closes the dialog box. Current selections are retained but
the input file is not created/updated, and no Gaussian job is submitted.
-
Defaults: Returns all items to their default values.
-
Help: Provides on-line help for this dialog box.
Setting Defaults for Gaussian Jobs
The Gaussian Setup preferences dialog may be used to specify defaults
for the Gaussian Calculation Setup dialog. Click the Calculation button,
and then specify the desired settings for future Gaussian calculations.
These will be applied to future job setup operations.
The Job Type Panel
The Job Type panel also appears in Figure 46. The top popup menu selects
the job type. The default is a single point energy calculation. The remaining
fields in the panel represent common options for the selected job type (the
figure shows the ones for an Opt Freq calculation).
In order to select a different job type than those listed in the popup menu,
select the blank menu item at the bottom of the list, and then type the appropriate
Gaussian keyword into the Additional Keywords section in the lower
section of the dialog.
You can also use this field to add any desired Gaussian keyword and/or
option. In the latter case, you must repeat the keyword within this field even
if it already appears in the route section. GaussView will merge all
options for the same keyword within the route section (see Figure 47 for an
example). Note that this area is designed only for adding keywords to
the route section. Use the Edit button for creating complex input files.
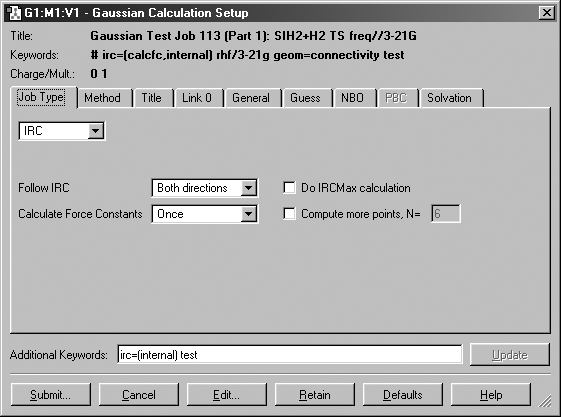
Figure 47. Adding an Option via the Additional Keywords Field
This window illustrates GaussView's ability to merge options from dialog
controls and ones typed into the Additional Keywords field. Here, we've added
the Internal option to the IRC keyword, while another option has been generated
with the Calculate Force Constants popup selection.
The Method Panel
The Method panel specifies the quantum mechanical method to be used
in a calculation. The default method is a ground state, closed shell Hartree-Fock
calculation using the 3-21G basis set. This panel is illustrated in Figure 48.
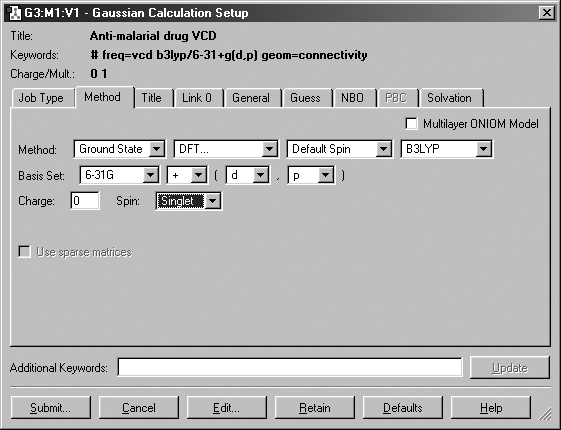
Figure 48. The Method Panel
The Method panel is where the model chemistry for the calculation is specified.
The fields in the Method line specify the following items
-
Whether the calculation is for a ground state or an excited state.
-
The theoretical method. For some choices, the fourth field is used to select
the specific method of the given type. For example, in Figure 48, the method
field is set to DFT, and the fourth field selects the B3LYP functional.
-
The wavefunction type (closed shell vs. open shell). The default is an
unspecified type. The Restricted, Unrestricted, and Restricted-Open
selections prepend R, U and RO to the method keyword
(respectively).
The Basis Set menus allow the selection of the basis set to be used
in the calculation. Polarization functions and diffuse functions may be added
to the basis set using the corresponding menus in this line. Select the blank
item at the bottom of the basis set menu to select a basis set other than those
that can be constructed via the controls in this area. You may enter any basis
set keyword in the Additional Keywords area.
The Charge and Spin fields specify the molecule's charge and
spin multiplicity. GaussView will select values for these fields based
on the molecular structure. They may be modified as needed.
The Title Panel
The Title panel holds a field used for the Gaussian title section
(designed to contains a brief description of the job). Type your description
into the text box.
The Link 0 Panel
The Link 0 panel is used for entering Link 0 commands for the job (see
Figure 49). Be sure to name the checkpoint file if you intend to visualize output
from this job. You can use the Checkpoint File button to specify its
location by browsing.
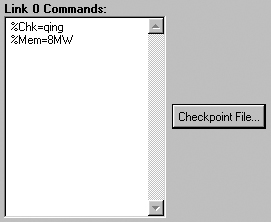
Figure 49. The Link 0 Panel
This panel specifies a name for the checkpoint file and also the amount of
memory to use for this job.
The NBO Panel
The NBO panel is used to select NBO analysis at the conclusion of the
Gaussian job. It is illustrated in Figure 50. The Type menu specifies
the kind of NBO analysis to perform. The Checkpoint Save field allows
you to save NBOs in the checkpoint file for later visualization (the default
is Don't Save).
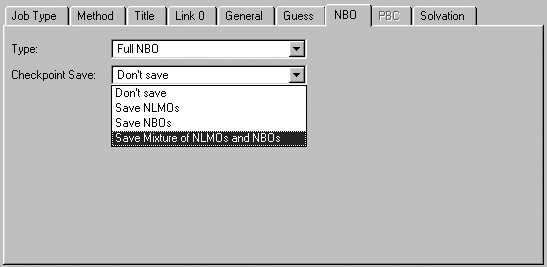
Figure 50. The NBO Panel
The panel specifies the type of NBO analysis and which NBOs to save in the
checkpoint file. The selection in this window is often a useful one when you
will use them to generate an active space for a CASSCF calculation.
The Solvation Panel
The Solvation panel allows you to specify that the calculation is to
be performed in solution rather than in the gas phase. It is illustrated in
Figure 51. The Model field allows you to specify a specific solvation
model (the default is PCM, which itself defaults to IEFPCM). You can also specify
the solvent by selecting it from the corresponding popup menu. Use the Other
selection to select a solvent other than those on the list. The dielectric
field will then become active.
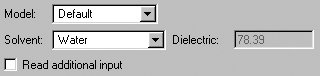
Figure 51. The Solvation Panel
This panel specifies the SCRF model to use for solvent effects. The Default
selection corresponds to SCRF=PCM.
Note that some solvation models may present different/additional fields for
their required parameters.
The General Panel
The General panel allows you to select some commonly used general calculation
options. It is illustrated in Figure 52.
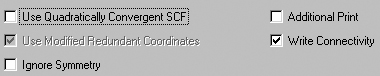
Figure 52. Selecting General Gaussian Options
This panel contains a set of commonly used options. This window illustrates
the defaults.
The following table indicates the Gaussian keywords corresponding to
these items
| Option |
Default |
Keyword |
| Use Quadratically Convergent SCF |
Off |
SCF=QC |
| Use Modified Redundant Coordinates |
On |
Geom=ModRedundant |
| Ignore Symmetry |
Off |
NoSymm |
| Additional Print |
Off |
#P |
| Write Connectivity |
On |
Geom=Connectivity |
The Use Modified Redundant Coordinates item is enabled only if you have
set up redundant coordinates with the Redundant Coordinate Editor. If
not, the item is ignored (despite its default value).
The Write Connectivity option also includes the appropriate additional
input section(s) within the Gaussian input file.
Note: The default SCF algorithm has changed with Gaussian 03, and we have
new recommendations for the few remaining problem cases (SCF=QC is not always
the best next choice). Consult the discussion of the SCF keyword in the Gaussian
03 User's Reference for details.
The Guess Panel
TheGuess panel contains settings related to the initial guess. It is
illustrated in Figure 53. Consult the discussion of the Guess keyword
in the Gaussian 03 User's Reference for full details on these options.
The Guess Method popup specifies the type of initial guess to use. It
has the following options:
-
Default: Uses the Gaussian 03 default initial guess.
-
Core Hamiltonian: Uses the Gaussian 98 default initial guess.
Not recommended unless only Gaussian 98 is available.
-
Extended Huckel: Uses the Huckel guess (Guess=Huckel).
-
Read checkpoint file: Retrieves the initial guess from the checkpoint
file (Guess=Read).
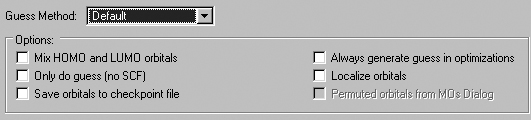
Figure 53. Gaussian Initial Guess Options
This window shows the default settings for the initial guess.
The options in this panel have the following meanings
| Option |
Default |
Keyword |
| Mix HOMO & LUMO in initial guess |
Off |
Guess=Mix |
| Only do guess (no SCF) |
Off |
Guess=Only |
| Save orbitals to checkpoint file |
Off |
Guess=Save |
| Always generate guess in optimizations |
Off |
Guess=Always |
| Localize orbitals |
Off |
Guess=Local |
| Permute orbitals from MOs Dialog |
On |
Guess=Permute |
The Permute orbitals for MOs Dialog is disabled unless you have specified
an alternate orbital ordering with the MO Editor. If enabled, it is on
by default.
The PBC Panel
The PBC panel is used to specify options to the Gaussian PBC
keyword (see Figure 54). Checking the Use PBC box causes the translation
vectors to be added to the molecule specification. This is the default when
a unit cell has been defined with the Crystal Editor. The panel is disabled
for non-periodic systems.
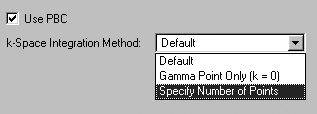
Figure 54. The PBC Panel
The Use PBC checkbox causes the translation vectors to be placed in the molecule
specification.
Previous Next