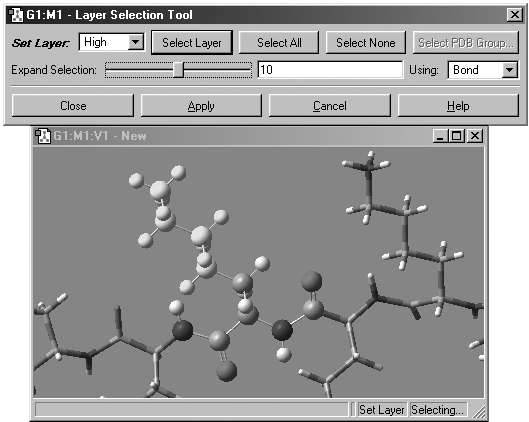
Figure 32. Assigning Atoms to ONIOM Layers
This dialog allows you to assign atoms to layers for ONIOM calculations. Different layers are indicated by the different display formats. Here, several atoms are selected for layer assignment.
Choosing the Edit=>Select Layer menu item or clicking on the Select Layer button opens the Layer Selection Tool. This windows is used to assign atoms to ONIOM layers graphically. It is illustrated in Figure 32.
Figure 32. Assigning Atoms to ONIOM Layers
This dialog allows you to assign atoms to layers for ONIOM calculations.
Different layers are indicated by the different display formats. Here, several
atoms are selected for layer assignment.
There are several methods for selecting atoms for layer assignment.
You can use one of the buttons at the top of the dialog. The All button selects all atoms in the molecule, and the None button deselects all atoms. The Layer button selects all atoms currently assigned to the specified layer. The Select PDB Group opens another selection dialog which allows you to select atoms by residue if this information was present in the PDB file corresponding to the current model (see Figure 33 below).
Use the left mouse button to select or deselect atoms manually, continuing until all the atoms that you want have been selected. Hold down the Shift key to add to the current selection.
Proximity-based selection: Select an atom, and then use the Expand Selection slider and proceed until you have selected all the atoms you need. Moving it to the right increases the distance used when selecting atoms.
For distance based atom selection, the distance between atoms to be selected depends on the following criteria, selected in the Using popup menu:
Bond, which selects only atoms that are bonded.
Distance, which selects an atom based solely on proximity to a current selection, regardless of whether or not it is bonded.
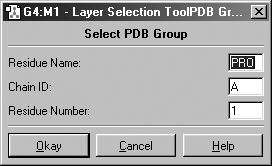
Figure 33. Selecting Atoms for Layer Assignment by PDB Residue
This dialog allows you to specify the desired residue by residue name (type),
residue number and/or chain (A or B). Omitted items act as wildcards. For example,
if you enter only residue number 5, then residue 5 in both chains will be selected.
Similarly, entering only a residue name will cause all residues of that type
within the molecule to be selected.
By default, atoms in different layers are displayed in different formats in the view window. Using the standard settings, atoms in the High layer appear in ball-and-stick format, atoms in the Medium layer are displayed as tubes, and atoms in the Low layer are in wireframe format. These can be customized via the corresponding fields in the Molecule panel of the Display Format preferences.
Once atoms are selected, you must click on the Apply button to assign them to that layer. Clicking on Apply turns off the selection.
Previous Next